Set Up The ArtiosCAD Integration Using CAD-X
The following topics describe how to set up the Esko ArtiosCAD integration with iQuote using CAD-X.
Prerequisites
You must complete the following prerequisites to complete this integration:
Purchase and install Esko ArtiosCAD and CAD-X. Typically, you would install this on the same server computer as iQuote but it is not required. Please note the port assigned to ArtiosCAD if you plan to use the Remote Installation configuration.
CAD-x requires a specific license that needs to be acquired with your Esko Representative.
Organize your ArtiosCAD design files (.ARD) in one directory on the same computer where you installed Esko ArtiosCAD. We suggest you then organize the files into different folders according to the template. This will make it easier to find them when creating an estimate.
Ensure that the iQuote Installer is available on the same computer as ArtiosCAD and that users have administrative privileges on the server computer.
Install And Set Up The iQuote Esko Service
The iQuote Esko Service is an application that works as an API to iQuote be able to access some features from ArtiosCad. This application was designed on top of Esko CAD-x, an Active-x component that has embedded many ArtiosCad functions to be used in a 3rd part application. iQuote Esko Service needs the Esko CAD-x properly installed and licensed in the VM/Instance it is running, so that all the ArtiosCad features can be available to be accessed by iQuote.
You can install the iQuote Esko Service on the same server as iQuote (Install the EPS iQuote Esko Service locally) or on another server machine (Install the iQuote Esko Service remotely).
Install the EPS iQuote Esko Service locally
Note: Use this procedure to install ArtiosCAD on the local server where you access your iQuote system. You must follow this procedure for iQuote versions up to 8.1.
Start the iQuote Installation program (iQuote Installer) and follow the prompts.
In the Information about the Service window, select Install iQuote Esko Service.

Note: When you upgrade iQuote, the installer verifies that the iQuote Esko Service is installed and makes this option unavailable.
Once the installation is complete, open Windows Services and manually start the iQuote Esko Service.
Set up the Esko URL
Navigate to the installation directory.
Open the Server/Bin folder and run iQuote Tools.
Click the Server tab and verify that the Esko URL is populated.
Notes:
● For local installations, you can accept the default URL.
● You can edit this URL path from the iQuotesettings.json file and the Appsettings.json file.

Install the iQuote Esko Service remotely
Notes
● Use this procedure to install ArtiosCAD on a remote (different) server from your iQuote system. This procedure applies only for iQuote version 9.0 and higher.
● When using this configuration, you must have the iQuote Esko service on the same computer where the ArtiosCAD software resides. You must also perform additional configuration steps to complete a remote integration.
● While the remote installation has advantages, please note that this configuration can impact iQuote calculation speeds when there are network issues.

Start the iQuote Installation program (iQuote Installer) and follow the prompts.
In the Information About The Service window, do not select the Install iQuote Esko Service check box. Click Next.

Once the installation is complete, navigate to the installation directory, open the Server/Bin folder and launch iQuote Tools.
On the Server tab in the Esko URL field, enter the correct path, including the port number, to where iQuote Esko Service is installed.

Click Save.
Manually update the URL path in the iquotesettings.json file, using the Update the Settings file topic in this guide as a reference.
Important: Each time you edit the URL using iQuote Tools, you must manually update the same URL in the appsettings.json file. Refer to the Update the Settings file topic for more information.
Update the Settings file
Navigate to the Access Server/Bin/WebAPI/ESKO directory and open the appsettings.json file.
Search for URLs in this file and edit the HTTP path to where ArtiosCAD is installed.

Save and close the appsettings.json file.
Copy the WebAPI folder to the server computer where ArtiosCAD is installed, as described below in the Copy the WebAPI folder section, then complete the installation.
Copy the WebAPI folder
Tip: This procedure shows you how to copy and configure the WebAPI directory/folder and ensure the proper folders are created and shared.
From the server computer where iQuote is installed and within the iQuote installation directory, locate and copy the WebAPI directory (Server\bin\WebAPI\ESKO).

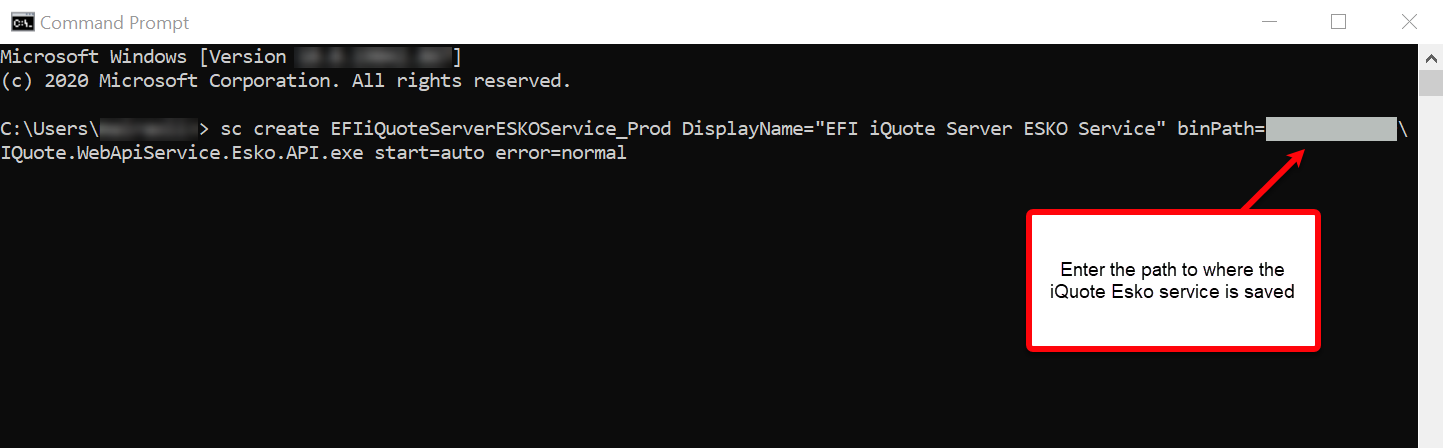
From the remote server computer where ArtiosCAD is installed, open a command prompt (DOS prompt) and enter the following:
> sc create EPSiQuoteServerESKOService_Prod DisplayName="EPS iQuote ESKO Service" binPath=PathToFolder\IQuote.WebApiService.Esko.API.exe start=auto error=normal
Close the Command Prompt.
Open Windows Services and start the EPS iQuote ESKO service.

Store the required designs in a folder in C drive. Copy and paste the location of the design files in the record containing Artios Cad-x Specification Characteristics.
Set up test environments for CAD-X
It is common to have a test environment and a production environment for iQuote. In this case, you must set up a different service – with a different port number – for each iQuote installation (Production and Test). This can be required due the differences of the API from one version to another.
We suggest you create two folders (PROD and TEST) on the remote machine where ArtiosCAD is installed and save a copy of the WebAPI folder into each one, as described in the Copy the WebAPI folder topic.
Note: For each service you must update the settings file.


Important: When you upgrade iQuote, make sure to copy the files from the WebAPI folder to the server where the iQuote Esko service is running, which manually updates the iQuote Esko service with the current version.
Configure The iQuote Integration For CAD-X Users
After you install and set up the Esko ArtiosCAD service, you must do the following to complete the integration configuration in iQuote:
Provide access control to Specification Characteristics and Components
Navigate to Administration > User > User Profiles and open the appropriate User Profile. The User Profile screen opens.
On the Permissions tab of the User Profile screen, navigate to EPS > Sales > Records > iQuote > Product Specification.

Enable access for the following product specifications:
Specification Characteristic Type
Specification Component Type

Click Save.
Create an Esko CAD-X specification characteristic type
Tip: Before you create a new characteristic type for CAD-X, in the Search box of the Specification Characteristic Type screen, search for any Specification Characteristic Type record with a code or description of Esko. If an “Esko – Artios Cad-X” Characteristic Type record already exists, skip to the Link the ArtiosCAD-X characteristic with a specification component type topic.
Navigate to Sales > Records > iQuote > Product Specification > Specification Characteristic Type.
Click New.
Enter a Description.
In the Characteristic Class field, select Esko – Artios CAD -X.

Select the Create Engineering check box and click Confirm.

Click Edit Characteristic Info.

Enter the path to the folder for the Esko Design files you created on ArtiosCad server.

Important: The folder above must be accessible by iQuote Esko Service only. Until version 11.0.1, it was required both iQuote.Server & iQuote Esko Service have access to the folder, but it is only required now iQuote Esko Service.
If necessary, specify the minimum and maximum formats for simulation.
Note: This step is optional but can be used to control the number of possible layouts for the engineering. The system sends the minimum and maximum format to CAD-X, which simulates the possible nesting in this format range.
If you leave these fields blank, iQuote uses the maximum format of your largest die cutting machine and the minimum format of the smallest one. iQuote also considers just production groups using the functionality, 1034 - Die Cutting – Sheet.
Click Confirm, then click Save.
Note: The ARD files should always be based on a 1-up design. During the calculation, iQuote prompts ArtiosCAD for the nesting layouts.

Link the ArtiosCAD-X characteristic with a specification component type
Navigate to Sales > Records > iQuote > Product specification > Specification Component Type (or enter Specification component type in the Quick Search field).
Select the carton box component or create a new one.
Select the Carton Format characteristic (e.g., Format – Carton package, Component Format – Carton) on the Characteristics tab to highlight it, then click Characteristic Options.

Click New and select the Esko ArtiosCAD-X specification characteristic you created (as described in the Create an Esko CAD-X specification characteristic type topic).

Click OK.
Create An iQuote Estimate Using ArtiosCAD-X
iQuote integrates with Esko ArtiosCAD at three points in the estimate process:
When you select a template (. ARD design file) in the product.
When you manually select the nesting options (_Select_nesting_options) for the estimate before the engineering calculation.
When the engineering is calculated and there is no nesting automatic fit option selected for the die layout.
Configure The iQuote Integration For CAD-X Users.
Navigate to Sales > iQuote > Estimate.
Create an estimate for a carton box product, then click the Product tab.
Tip: By default, the system displays the main characteristic, which in this example is Carton Format. However, you can click the format characteristic name on the Product > Specification tab to use a package layout from Esko ArtiosCAD-X.

On the Product > Specification tab, click the format name to display the Carton Characteristic drop-down menu.

Select Esko ArtiosCAD-X from the Carton Characteristic drop-down menu.
Note: You can skip this step if Esko – ArtiosCAD-X is already the default format for this product.
The Esko ArtiosCAD-X area opens and replaces the Carton format area.

Complete the fields in the Esko ArtiosCAD-X area, using the Select an .ARD file topic as a guide.
Select an .ARD file
After you select the Esko – ArtiosCAD-X format on the Product > Specification tab of the Estimate screen, complete the fields for the characteristic in the Esko ArtiosCAD-X area, as applicable:
In the Template’s folders field, select the folder where the carton template is saved.
In the Template field, select the desired .ARD file.
The system automatically populates the Length, Side (Width), and Height (Depth) fields, based on the template you select. However, you can edit these fields, as desired, if the template permits changes.
Tip: If you select a template that does not include any format at all, iQuote considers it to be an irregular format, but still calculates the engineering.
The system automatically populates the Grain Direction field after you select a template. This field is not editable, but you can change the grain direction of the product in the Paper record by using the iQuote standard grain direction characteristic.
Tip: iQuote displays a thumbnail image of the design on the right size of the Esko ArtiosCAD-X area after you select an .ARD file.

Click Details to define the size of the glue flaps. The Details pop-up screen opens.

Note: The unit of measure is defined on the Company record, and the default value is always 10mm (or equivalent).
Click OK to close the Details pop-up screen and return to the Estimate screen.
Click Die Layout if you want to select nesting options and layouts and specify design calculation restrictions. Otherwise, skip to step 8. The Die Layout pop-up screen opens.

On the Die Layout pop-up screen, complete the following fields, as applicable:
In the Layout Style field, select one of the following Nesting Options, as provided by Esko ArtiosCad:
Straight nest
Reverse 2nd row nest
Reverse 2nd column nest
Reserve 2nd row align nest
Reserve 2nd column align nest
Tip: For detailed information and images of each nesting option, refer to the Nesting Options topic in this guide.
In the Package Trimming Horizontal and Package Trimming Vertical fields, enter the respective amount you want to trim out horizontally and vertically.
Select the Aligned Trimming check box if you want to align the different elements in the printing sheet.
Select the Define Die Layout Manually check box if you want to select a specific layout or options of layouts in a separate grid before the engineering calculation.

Notes
● If you select the Define Die Layout Manually check box, you must manually select or create a die layout for the system to calculate this estimate. Leave this check box deselected if you want the system to automatically define the die layout according to the information provided.
● You can create a new specification for a new layout, but it will not be connected to the Esko ArtiosCAD integration.
If you selected the Define Die Layout Manually check box, do any of the following in the grid at the bottom of the Die Layout pop-up screen, as applicable. Otherwise, skip to step 8.
Click Select Die Cutter to choose a Die Cutter record.
Note: The record you select will not be connected to the Esko ArtiosCAD integration.
Click Automatic Fit Options to choose from a list of fitting options from Esko ArtiosCAD, then click Confirm to accept the selected option.

Click OK to return to the Product > Specification tab of the Estimate screen.
On the Product > Specification tab of the Estimate screen, click Calculate or Recalculate, iQuote connects with ArtiosCAD, and ArtiosCAD provides a list of possible layouts, based on the design you selected and predefined rules. iQuote then calculates the engineering and selects the most cost-effective route, considering the nesting options simulated by ArtiosCAD.
Tip: All other features of iQuote are available, so you can select a different layout, machine, or change speeds, materials costs, etc.