What is in the Job
Once the Job is created the user can navigate through its different tabs and check or edit the job information, as need.
Note: The new Job, created from an Estimate or from a Product Specification, is independent. That means no modifications executed on the Job will affect the original Estimate or PS. However, it is possible to change a Job through changes made in the original Estimate.
To do so, first go to the original Estimate and change its status back to “Make estimate”, then change it as needed and save it. Back to the respective Job the user will see a message asking if the changes will be accepted.
If the user chooses “yes” all the changes made in the estimate will be applied to the Job.
General
On this tab the user finds all the basic information regarding this Job. Depending on how the job was created (from an Estimate, from a PS or from another Job) some fields will be already filled in and some will not even be editable.

Under Job complete the fields as described:
|
Field |
Description |
|
Job number |
Displays the identification number for this Job. |
|
MIS Job ID |
Indicates the corresponding ID in the Monarch or Radius system, if there is an integration. |
|
Description |
Displays the identification name for this Job. |
|
Customer |
Displays the customer’s name and identification code. |
|
Contact |
Displays the name of the customer’s contact. |
|
Project |
Allows the user to specify the project that this job belongs to. |
|
Estimate |
Displays the original Estimate’s code and name. |
|
Salesperson |
Displays the name of the salesperson responsible for this Job. |
|
CSR |
Displays the name of person responsible for this dealing with this job’s customer. |
|
MIS Sales Order ID |
Indicates the corresponding Sales Order ID in the Monarch or Radius system, if there is an integration. |
|
Plant |
Allows the user to specify the plant where this job will be produced. |
|
Product division |
Allows the user to specify the product division the job belongs to. |
Under Product information complete the fields as described:
|
Field |
Description |
|
Over |
Allows the user to inform the percentage of surplus production acceptable for the job. |
|
Under |
Allows the user to inform the percentage of production less than hired acceptable for the job. |
|
Earliest start |
Displays the minimum date for starting this job’s production. |
Under Classifications complete the fields as described:
|
Field |
Description |
|
Repetition type |
Allows the user to specify if this Job refers to a New product, a Repetition or a Repetition with modification. |
|
Rework |
Allows the user to specify if this Job refers to a rework, that is a job that needed to be redone. |
Under Cost information complete the fields as described:
|
Field |
Description |
|
Cost table |
Displays the cost table in which this job’s price calculation was based. |
|
Reference date |
Displays the reference date for the cost table used for this job. |
|
Currency |
Displays the currency used for this job’s payment. |
|
Reference date |
Displays the reference date for the currency conversion used for this job. |
|
Tax exempt |
Indicates if this job is exempt from taxes. |
|
FSC |
Indicates if this product is FSC certified. |
|
Reference date for ACR analysis |
Displays the date that will be used as reference for the post calculation functions. |
Under Other information complete the fields as described:
|
Field |
Description |
|
Customer purchase order |
Displays the customer’s order number. |
|
Drawing number |
Drawing number |
|
Partial order number |
Partial order number |
|
Priority |
Allows the user to define a priority grade that will be used in the M3 Planner for scheduling different jobs. The lower the number, the higher the priority. So the highest priority possible is 1. The default priority set by the system is 100. |
|
Job color in Gantt |
Allows the user to specify the color that will identify this job in the Gantt chart. |
The product’s technical information is described under the Product tab. The fields in this tab are for information only and cannot be edited.
The product’s detailed dates are listed under the Dates tab. The dates in this tab are can be edited.

Product
This tab displays this product’s specification. The user can modify the information on these fields as needed, but it will be always already completed by default, based on the information given by the original Estimate, Job or Product specification.

Check the information on each field and edit it if necessary.
To add other information in the product specification that are not displayed in the component, click + in the left side menu.
Note: For more information on product specification refer to Introduction to Estimating and to Product Specification Records.
Note: The system indicates with an exclamation icon when there is a mandatory information pending in one of the product components:

Other important buttons on this lateral menu are described below:
|
Button Name |
Function |
|
Add |
Allow the user to add a new component. |
|
Duplicate |
Allow the user to add a new component identical to an existing one. |
|
Delete |
Allow the user to delete a component. |
If any changes are made, click Recalculate in the toolbar on the top of the screen.
Quantity/ Shipping
This tab displays all the information on how many products will produced, the linked inventory item and where and when they will be delivered. Once again, on this tab some fields will not be available for edition depending on the Job’s origin.

Under Products the following fields are displayed:
|
Field |
Description |
|
Product |
Displays the product’s name. |
|
Inventory item |
Indicates the corresponding ID in the Monarch or Radius system, if there is an integration. |
|
Type |
Indicates if the data in that line refers to a production item or a shipping. |
|
Quantity |
Displays the number of products in this Job. |
|
Balance |
Shows the relation between produced and shipped items. |
|
Unit |
Displays the original Estimate’s code and name. |
|
Date |
Displays the job’s date, |
|
Sales Order |
Identifies the sales order related to that product item. |
|
Type of shipment |
Shows the selected the type of delivery: Customer pick up External provider Internal freight |
|
Carrier |
Shows the selected carrier for this shipment. |
|
Ship method |
Shows the selected appropriate shipping method for this type of shipment. |
|
Ship to |
Shows the selected address where this ship is sent to. |
|
Inventory item description |
Displays the name of the customer’s contact. |
|
Product specification |
Displays the product specification identificação. |
|
Product line |
Displays the minimum date for starting this job’s production. |
Note: Depending on how the Job was created, some of those fields will not be available for edition.
Engineering
This tab displays the job’s whole production route, showing which machines and materials will be used.

Clicking on each component or step, it is possible to select and edit the route and view details by as highlighted below:

Using the buttons in the left it is possible to modify the engineering route view:
|
Button |
Name |
Function |
|
|
View by process |
Displays the detailed production route divided into each process: prepress, press and finishing |
|
|
Information displayed |
Allows the user to define what informations will be displayed in the diagram: Components Activities Raw materials Secondary processes Cost Production Plant |
|
|
Component’s view |
Allows the user to select the different components from the product and have an exclusive and detailed view of it. |
|
|
Reset default zoom |
Allow the user to return to the original zoom setting. |
|
|
Focus area zoom |
Allows the user to select a specific area and zoom it in. |
|
|
Zoom |
Allow the user to manually control the zoom. |


Cost
This tab displays a table describing the production costs calculated in the Job:

Note: you can click the printer icon in the tool bar to print these reports.
If necessary, click Restore default cost button to undo any changes in quantities and values for a given cost group.

The system displays the Standard view type by default. This option always shows the current job costs and will be automatically updated if any changes are made in the job:
Besides the Standard view, this tab also provides the Estimated x Planned and Estimated x Planned with chart options, that allow the customer to compare the estimated costs with the planned costs:
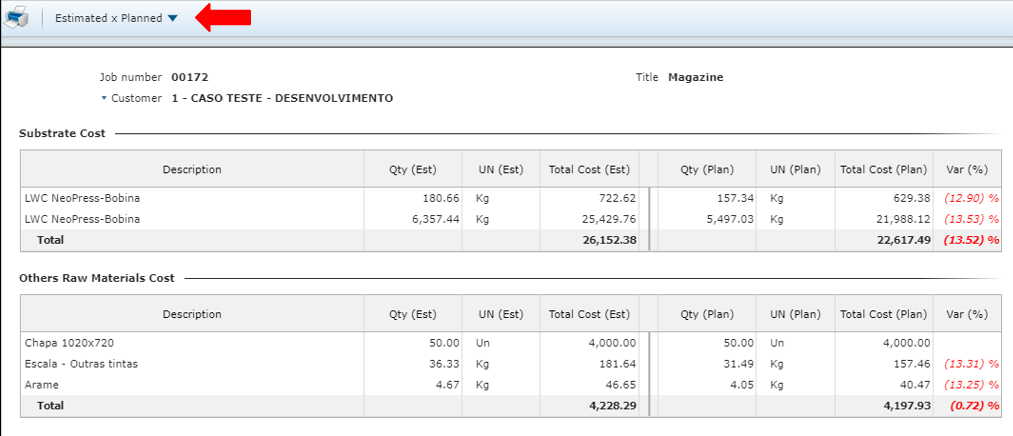

Note: A job may not have an estimated cost (if it was not created from an estimate) either a planned cost (if one was not saved yet) and in these cases the Estimated x Planned views will show no data. But it always have a current cost and, therefore, the Standard view.
Both options compare the cost value from the Estimate (estimated cost) against the planned cost.
The “planned cost” is like a ”picture” taken from a chosen status of the Job. To define from which status the planned cost will be taken go to Job general settings, under Cost analysis and results setting, select the status in which the planned cost will be recorded:

The planned cost will be recorded every time the job is saved in the chosen status. That means if the chosen status is “sent to production”, for example, the user has to:
Change the Job status to send to production
Save it. The costs as they are in this stage will be considered “planned costs”.
Change it back to the previous status
Make any changes in the cost
Save it again
Access cost tab and check the comparison between the current (estimated) and the planned costs.
Note: Any time the job is saved being in the chosen status the planned cost values will be overwritten by these new ones.
Planning
On this tab the user can view in details how each part of each component is organized for production, incluiding information such as quantities, planned starting and finishing dates, respective activity etc.
The fields on this tab are only for information and cannot be edited.

Materials
All the elements that are part of the job’s product are listed on this tab alongside with the respective materials information used in each element.
The data under Supplier and Inventory item can be added or edited. The other columns on this tab are only for information and cannot be edited.

Notes
On this tab the user can enter any relevant notes about this job. By default the system provides the General Notes fields, but the user can create other fields as needed in Planning > Records > Planner > Job note type. Also, clicking the Copy notes from other Job the user can select a previous Job to copy the observations from.

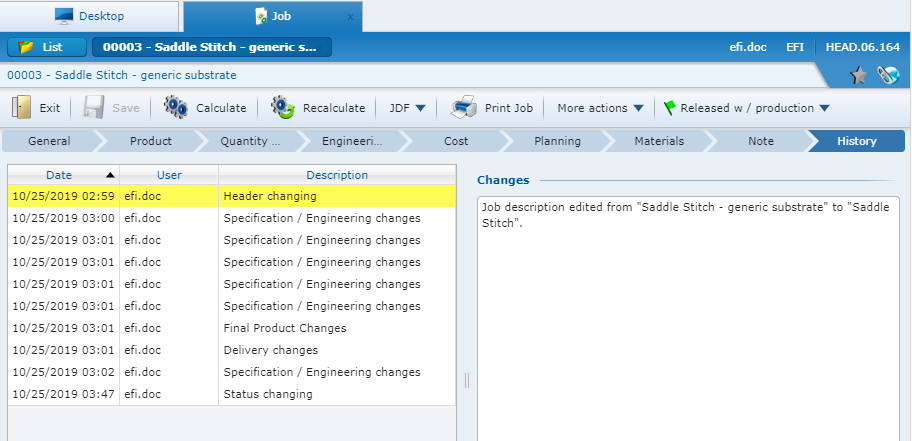
History
Under History the user can find logs on most changes made and saved in this job: